Tag Archives: recipe

Chicken with Balsamic Tomatoes

It was below 0 when I got up this morning to go to the gym. Enough already!  😡 I am really getting antsy for spring. I warmed up and then did the weights.

Exercise Set/rep/weight Muscle worked
Lying leg press 3 sets of 10 at 110# <—increase Lower Body
Dumbbell pull over 3 sets of 12 with 20# DB Back
Captain’s Chair 3 set of 10 Core
Incline Chest Fly 3 sets of 10 with 15# DBs (30# total) Chest
Calf Raise 3 sets of 10 at 170# Calves
Good Mornings 3 sets of 10 at 55# Low Back and hammies
Upright row 3 sets of 10 with 30# bar Shoulders

The gym was crowded today. Well, crowded for my gym at any rate. Tuesdays are normally very quiet, but I think people that didn’t come yesterday because of the snow came today.

Came home to peanut flour waffles!

I am totally addicted to the peanut flour, so I think I will have to order some online and stock up.  Or drive 3 hours to a Trader Joe’s.  Road trip!!!

You know, lately I feel like life has been in such flux, especially since I lost one of my jobs in January and then I changed up my workout schedule.  Now things just seem… unsettled.  I can’t put my finger on it because nothing really has changed outwardly in any drastic way, but I feel like I am waiting for something to happen, but I don’t know what that is.  Guess I am supposed to make something happen, but I don’t know what that is, either.  And I am a little tired of thinking about it.

Anyway, I also had some trouble thinking of lunch.  Didn’t feel like eggs and today is a lower carb day.  Chicken on the menu for dinner already.  So, mish mash – welcome to the table!  I split open a magic roll, toasted it, and did half almond butter and half cream cheese.

This was good, I have to say.  Plus a perfectly ripe pear.  Filling as well – yay fat!

Not much work this morning, which means pile it on later in the day.  Sigh.  Part of that unsettled feeling.  John made up the lattes this afternoon.  I am loving the new Saigon cinnamon.  Sprinkle, sprinkle!

and peanuts:

I planned out dinner tonight with the thawed chicken breasts.  We decided on the Chicken with balsamic tomatoes from ReadySetEat.

  • 2 tablespoons oil (we used coconut)
  • 4 boneless skinless chicken breasts (4 oz each)
  • 1/2 teaspoon garlic salt
  • 1/4 teaspoon ground black pepper
  • 1 cup sliced onion (we used 1/2 cup diced)
  • 1 can (14.5 oz each) diced tomatoes, undrained (they recommend seasoned ones, but we just had plain)
  • 1/2 cup balsamic vinegar

Heat oil in medium skillet over medium-high heat.  Sprinkle chicken with garlic salt and pepper; cook chicken 5 to 7 minutes or until browned, turning once. Remove from skillet; set aside. Add onion to skillet; cook 1 to 2 minutes over medium heat or until crisp-tender.

Add undrained tomatoes and vinegar to skillet; bring to a simmer. Return chicken to skillet; cook 10 to 12 minutes more or until chicken is no longer pink in center.  I added some dried basil and oregano to this.

The only thing I added different was when the chicken was done, I added a couple teaspoons of cornstarch mixed with a couple tablespoons of water to thicken the sauce a little bit.

They recommend serving with pasta (which John had), but I had mine with broccoli!

Serves 4

Calories: 226

Fat: 9.3 g

Protein: 23.2 g

Carbs: 12.4 g

This was quite good and very easy.  I think I might cut down the vinegar a bit next time or get a better quality one :mrgreen:   We have leftovers, so you will see this tomorrow!

We were supposed to go out for coffee tonight, but with all the late work – somebody is working at nighttime.  3 guesses as to who that is…

Guess I will make some decaf for home sipping.

Question:  Ever cooked with balsamic vinegar?

Homemade coconut butter

If you have ever shopped Whole Foods or Trader Joe’s, you have probably seen Coconut Butter.  Of course, those of us in dinky towns that do not have a Whole Foods or Trader Joe’s can either order online or do without.  Well,  I decided I didn’t want to do without anymore, and I was so not ready to fork out $13 for a jar plus shipping.  I had seen a lot of blogs where people made their own, so I thought I would give it a whirl.  And so the adventure began.

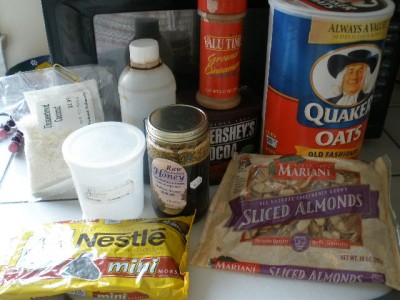
Ingredients:

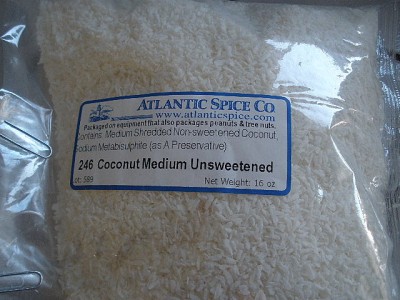
Easy enough.  Note – *do not*, repeat *do not*, use sweetened coconut flakes.  They will never make butter as they are too soft and moist.  We have a small store that sells unsweetened coconut, and it is actually quite inexpensive.  Or, I order it from Atlantic Spice (sister company  on the west coast is SF Herb Co) when I am ordering my hugejass bags of cinnamon 😀

I measured out 8 oz of coconut and put it into my mini processor.  This was mistake #1, as it was too much for my tiny processor.

It was happily whirring away, and I knew it would likely take 15-20 minutes, so I waited.  It became fine and almost looked like it was going to ‘butter up,’ but then it kept getting stuck.  I did not want to overload the processor, so I thought the blender would work.

Transfer to blender = losing about 1.5 ounces on the counter and floor.  Sigh.

I turned on the blender and it started to blend, then got stuck and unstuck.  Then I smelled burned rubber.  😯   Okay, time to evacuate!

I took it back over to the processor and decided to batch it.  And voila!  That started to work.  It was getting creamy, and I kept adding more in.  You will need to stop and push the coconut down periodically.

Once I was done with the whole shebang, 30 minutes had elapsed.

The result?

Nice! It is not a totally smooth texture, but the coconut flavor is ah-mazing.  It almost tasted sweet, too!

What to do with this stuff?

Or, you could put it on oatmeal or on toast or even on something like chicken or fish!

Note this will become solid at room temperature (depending on how cold your house is).  Just heat it up for about a minute in the microwave or scrape out what you want and let it melt.  The fat from coconut oil is a medium chain fatty acid and actually quite good for you, unlike what the CSPI says.

My tips for making this would be:

1. Don’t use the coconut straight from the fridge.  Let it come to room temperature so it won’t take so long.

2.  Start the blending in small batches.  This was tougher than even almond butter, for some reason.

3.  Most important – Be patient.  It can take up to 1/2 hour to do this.

Homemade Cacao Bliss:

Following my own tips above, I made another batch.

This time with cocoa powder and honey.

Ingredients:

  • 8 oz of unsweetened dried coconut
  • 1 tablespoon cocoa powder
  • 1 tablespoon of honey
  • 2 tablespoons coconut oil

This batch I was smart and processed a couple ounces at a time.  This does take a while.  I would say about 30 minutes of processing, stopping and pushing the coconut down periodically, so plan ahead if you want to make this.  Maybe it would be different in a super duper processor and not my little mini.  Someone needs to let me know 😀

After the coconut has ‘buttered’ – add in the cocoa powder:

Put the lid on and process.  You could just leave it at this point if you want.  I drizzled in a tbsp of honey:

This seized it up a little bit, so I added about 2 tablespoons of coconut oil to help smooth it out.  Not sure why the honey did that, but I find that happens with nut butter as well.

Kind of like a melted Mounds Bar.  Yes  it is.  Approved by John!  I think you can be safe to use the nutritionals for Artisana coconut butter for this, which is 92 calories per tablespoon.

Enjoy!

All buttoned up with Chicken Corn Chili

This is one of those days when I am so, so glad to work from home.  We are lucky to be above the sleet line and have all snow up here.  Of course it is a lot of snow!

John went out twice with the snow blower to keep it under control while I worked.  He is gunning for his 15 straight win of Husband of the Year.

I made a warm and comforting breakfast to start the day.  I did cream of wheat (with egg whites whisked in) topped with the apple/cranberry topping, which I made with raisins instead.

This is in lieu of Bagel Wednesday as we just couldn’t get out.  Hopefully Thursday!

I had some munching problems early in the day.  I was very hungry for some reason.  I tried to get extra protein with lunch with a double dose of tuna:

Kiwis are back!  Yippee!  I also actually had probably another entire serving of these pretzel thins while making lunch.  Just to be honest here. 😳

Then I went out during the afternoon break in the snow to skim off the driveway and sidewalks. This is our front walk.

I think there is a yard under here somewhere:

There really is nowhere to put the snow!

Bobsled chute:

Yay – I am so happy to be shoveling 😀

I look irritated, but I actually am not.  My eyes are sensitive to brightness. Even on a cloudy day, the snow is bright enough to make me squint, which produces what we have affectionately named “the divot” between my eyebrows that is permanent.

I was ready for this when I came in!

Weather like this calls for some warm and tummy filling chili.  In my effort to do more recipe cooking this month, I decided to make the Chili with Corn, chicken, and chipoltes from Sunday Soupby Betsy Rosbottom.  I made some modifications to this,including using already cooked chicken, not adding beans, and reducing the recipe size.  Changes I made are marked with an asterisk.

  • 1-1/2 tbsp of oil (I used coconut) *
  • 1/2 cup of chopped onions (which I pureed) *
  • 1/8 cup of flour
  • 1 tbsp chili powder
  • 2 tsp ground cumin
  • 1/2 tsp salt
  • 3 cups of vegetable broth *
  • One 15 oz can of chopped tomatoes, drained
  • 2 chipotles in adobo sauce, chopped (I divided a can of these up and froze portions for convenience).
  • 2 cups of frozen corn kernels
  • 6 oz of cooked chicken breast, chopped *

Heat the oil in a soup pot and saute the onions until lightly browned (several minutes).  In a small bowl, mix the flour and spices together and sprinkle over top the onions.  Stir and cook for 1 to 2 minutes.  Then add the broth slowly, whisking to make sure you don’t get clumps. Then add tomatoes and chipotles.  Bring to a simmer,cover, and cook until the mixture has thickened –  about 15 minutes.  Then add the corn and  chicken.  Cook for 10 more minutes until everything is heated through.  It helps if the corn kernels are thawed.   :mrgreen: Makes 4 servings.  Season to taste with salt and pepper if desired.  This is more like soup than chili, so if you cut down to 2 cups of broth, it would probably be thicker.  Each serving is about 2 cups!

Each serving has 216 calories, 6.5 grams of fat, 28 grams of carbs, 2 grams of fiber, 13 grams of protein.

This was really good.  It is quite spicy, so you may want to either leave out the adobo chipotles or reduce the chili powder a bit.  I like it hot.  John was getting sweaty, though! 😈

My work slowed down some as the clinic lost a lot of patients from the snow storm.  I now have time to do my 15 minutes of cleaning and some bike trainer riding.

Question:  What’s your spice level?

Recipe: Peanut Flour Waffles

So we have been playing with the Peanut Flour a bit around here.

The next stop?  Making protein waffles with them!  Normally, my protein waffles have an egg, cottage cheese, and oats as their base.   I had the brilliant (if I may say so) idea of replacing the oats with peanut flour!

Very few ingredients, which is always good for breakfast.

While the waffle iron heated up, I put the following into my bullet blender cup:

  • 1 egg
  • 1/4 cup of peanut flour
  • a lot of cinnamon 😉
  • 1/3 cup of cottage cheese (1%)
  • 1/4 tsp baking powder

If you want a sweeter waffle, add a sweetener of your choice, keeping in mind that I am used to unsweetened stuff.  Then I put on the blade and turned on the Magic Bullet Blender.  We have had this thing for probably 6 years now!

You can use a hand blender, mini food processor, or immersion blender.  You just need the batter smooth.

I then poured this into the waffle iron and let cook.  I did have a bit of waffle runoff, so keep that in mind.  Maybe a smaller egg or a little less cottage cheese would prevent that.

Voila!  Gluten free waffles.

These are topped with a banana that has been mashed with 1 tbsp of real maple syrup and warmed in the microwave.

The waffles came out fluffy and tender.  They didn’t stay real crisp, although they came out of the iron crispy.  The taste was good as well, and not super peanuty, which I thought they would be because the raw batter had a really strong peanut taste to it (yes, I ate raw batter with an egg).  They also smelled absolutely divine while cooking!

Stats for the waffles without topping:

This makes one batch of waffles for your iron, which is 4 squares, or 1 giant circle as mine does 😀

240 calories

9.5 g of fat

12.5 g of carbs

4 g of fiber

31.5 g of protein!!

The banana/maple topping adds about 140 calories to this depending on the size of the banana.

Another option for these is to use them as bread for sandwiches.  If you don’t sweeten them, they are perfect for savory dishes.

Enjoy!

Parnsip and butternut squash soup

I had a craving for soup over New Years, and for some reason a squash apple soup was on my mind. However, I did have parsnips available, so I thought “Why not make a squash and parsnip soup?”

Here is the result.

Ingredients:
1 tablespoon of oil of your choice (I used coconut)
1/4 cup chopped onion
8 ounces of parsnips (2 large)
2 medium apples
1 16 oz bag of frozen butternut squash (you could use fresh, I am lazy).
3 cups of vegetable broth
1/4 cup evaporated skim milk.
salt and pepper

In a large saucepan, heat the oil and add the onions and a pinch of salt. Keep the heat on medium as you want to sweat the onions, not fry them.

Chop the parnsips and apples (peeled).

Once the onions are translucent (5 to 10 minutes, or as long as it takes to chop the parsnips and apples), add the parsnips.

Cook for 2 or 3 minutes, then add the veggie broth.

Bring to a boil, then simmer for 10 minutes.  This is just to give the parsnips a head start on cooking. After 10 minutes, add the apples and the squash.  I would suggest you use a larger pot…

Bring back to a boil, then reduce heat, cover, and simmer for 20 minutes.  This may vary depending on how small you chopped the parsnips.  When the parsnips are soft, they will be translucent.  Not sure if you can see this or not.

Now time to put the spurs to it!

You can either batch process this in a blender or food processor if you don’t have an immersion blender.

After the soup is smooth, add in the evaporated skim milk.

This just adds the illusion of heavy cream.  Rewarm if necessary.  Add salt and pepper to taste and serve!

Good with crumbled crackers on top – or I bet a drizzle of maple syrup would be awesome!  This soup has a really full parsnip flavor to it, which is sort of like a carrot.  Tasty.

Makes 6 cups of soup.

Calories per cup: 139.1
Total Fat 2.4
Total Carbohydrate 24.3
Dietary Fiber 3.3
Protein 2.7

Recipe Tuesday – Cinnamon Raisin Bread

On Saturday, John was out of town and so I was left to my own devices with no car.  I have been thinking about making cinnamon raisin bread for a while now.  I have never done a rolled up bread before.  Normally we use the 5-minute bread method, but since I had a whole day on my hands, I wanted to do it the old-fashioned way.  Of course, I couldn’t leave any recipe well enough alone.  I wanted a lighter loaf than whole wheat, so I decided to do a half and half mixture.

Cinnamon Raisin Bread

  • 1/4 cup warm water  (100-110F)
  • 1 tablespoon active dry yeast
  • 1 cup 1% milk
  • 1/4  cup packed brown sugar
  • 1 1/2 tsp  cinnamon
  • 3/4 tsp salt
  • 1 tsp vanilla extract
  • 3 tablespoons of coconut oil, melted.  (you could just use oil)
  • 1-  1/2 cups unbleached all purpose flour, +1/4 to 1/2 cup for kneading
  • 1-1/2 cups white whole wheat flour
  • 3/4 cup raisins

Filling:

  • 1 tablespoon melted butter
  • 1/2 cup packed brown sugar

Set the raisins in a bowl and cover with very hot water to plump them up.

In a stand mixer (or large bowl) add the warm water and yeast:

Let this sit for 10 minutes until it is foamy.  You can use this time to assemble the rest of the ingredients.

The yeasties are all awake and active now!  Add to this mixture the milk (I warmed this a bit in the micro), 1/4 cup brown sugar, coconut oil,  cinnamon, salt, vanilla, and 1 cup unbleached flour and 1 cup of white whole wheat flour.

Mix until this batter comes together:

Now add in the other 1/2 cup of white flour and the other 1/2 cup of wheat flour.

Mix to incorporate.  Then switch to the dough hook:

If you don’t have a dough hook, you can turn this out onto a floured surface and knead for 10 minutes.  If the dough is super sticky, add in some of the reserved 1/4 cup of white flour.  You don’t want the dough really dry, it should be a bit sticky.  How much will depend on the humidity of the day.

If you have the dough hook, just turn it on and add the extra flour:

The dough will pull away from the sides of the bowl and the bottom.   After 10 minutes, drain the raisins and add them to the bowl. Please make sure you  drain the raisins.  Mix in.

I ended up having having to knead in some by hand.  Form into a ball and placed in an oiled bowl.

Cover with plastic wrap and let it rise in a warm place for about 2 hours until it doubles in size.  If your house is cold like ours, put the bowl in your oven with the oven light on.  That will give a tiny bit of heat.

We have liftoff!

I was all excited at this point 😀   Now is the time for filling and rolling.  Lightly flour a large surface and dump the bowl out.  Melt the 1 tsbp of butter and get a pastry brush.

Press the dough into a large rectangle approximately 10 inches by 14 inches.  It is quite easy to do this by hand, you don’t need a rolling pin or anything.

Brush the dough with the melted butter:

Spread the 1/2 cup of brown sugar evenly over the surface:

Roll the dough up from the short side.  Roll really tight:

Then drop seam side down into the a greased loaf pan.

Cover with plastic wrap and let rise for another 45 minutes to an hour.  Preheat the oven to 400, remove the plastic wrap and bake for 30 to 35 minutes.

I could barely wait for it to cool to cut into it and see how my first attempt went.  Is it bread?

Oh my yes….

There is only one word… wow.  This was soooo good!

Time consuming, yes – but therapeutic and so worthy.

Stats: If you cut the loaf into 12 slices:

Calories:  228

Fat: 4.9 g

Carbs: 47 g

Fiber: 2.4 g

Protein: 4.8

Definitely a dessert bread.  Totally worthy!

Recipe Tuesday: Lightened up eggnog!

I loves me some egg nog, you all know that.  Unfortunately, the light versions of the store bought stuff are full of ick!  John has become the maker of the nog in our house and lightened up Alton Brown’s version:

Ingredients:
  • 4 eggs, separated
  • 1/3 cup  plus 1 Tablespoon sugar
  • 3 cups 1% milk
  • 1 tsp fresh grated nutmeg
  • 3 oz bourbon (optional)
Beat the egg yolks with a whisk in a large bowl until they lighten in color.   Add 1/3 cup of sugar and mix well.
Meanwhile in a medium saucepan, cook the milk and nutmeg on medium-high heat, stirring often.  Heat until barely boiling.  Then turn off the heat and  “temper in” the yolk mixture (mix a small amount of the milk into the yolks, then gradually add more and more while you keep stirring until the yolk mixture is hot).  Add the tempered yolk mixture to the rest of the milk in the saucepan and stir.  Allow to cool, and pour through a sieve into a storage container.  The sieve will remove any cooked egg bits and/or scalded milk.  Let the mixture cool.  You can chill and consume as is, or…
Option 1:  Beat the egg whites to soft peaks, and add 1 tablespoon  sugar.  Mix into the cooled egg nog mixture.  You can skip this part if you don’t care for frothy nog, or if the raw egg whites scare you.  Or you can use pasteurized liquid egg whites.
Option 2: Add 3 oz bourbon.  Don’t be afraid of this step, it’s quite good!  Or you could just drink the bourbon while you are making the nog.  That works as well.
Stats: If you use 1% milk, 217 cal per cup or about 110 per 1/2 cup (this is without the bourbon) fat: 6g, protein: 12g, carb: 29g.  * 1 whole cup of this nog is the same as about 1/2 cup of other eggnog and no HFCS!!

BTW per John, the nog seems just thick enough using 1% milk, but it might be pretty thin if you try to use skim.
Thank you to John!

Recipe Tuesday: Almond Joy Granola

Back on the homemade granola wagon!  We had been buying some boxed stuff, and I had received granola from Attune (which I can’t get locally…booo).  I was enamored of the little chips in the Attune granola and wanted to try to recreate this at home.  One thing that I don’t like about granolas, though, is that any chips fall to the bottom and it is hard to keep it evenly mixed.  I came up with a good solution.

Here is Almond Joy Granola:

Ingredients:


The dry:

  • 3 cups of rolled oats
  • 1/4 cup of unsweetened coconut (you can use sweetened)
  • 1/2 cup of sliced almonds
  • 1 tsp of cinnamon
  • 1/3 cup of mini chocolate chips

The wet:

  • 1 tablespoon of coconut oil (could use any oil, coconut just adds awesome flavor)
  • 1 tablespoon of water
  • 2 tablespoons of brown sugar
  • 1/3 cup of light honey (or use corn syrup)
  • 1/4 tsp of salt
  • 2 tablespoons of cocoa powder

Preheat the oven to 300 degrees F

In a large bowl, mix together the oats, coconut, almonds, and cinnamon.

In a small bowl, mix the water, coconut oil, brown sugar, honey, salt, and cocoa powder.  Heat this a little in the microwave if your coconut oil is solid.

Add the wet to the dry.

Just keep mixing and mashing to coat all the ingredients.

Spread the mixture out onto a baking sheet.  I lined mine with a silicone mat, but you probably don’t need to do this.

Bake at 300 degrees F for 30 minutes, stirring the granola every 10 minutes.

Pull the granola out of the oven and smooth it out in a single layer.  Then sprinkle the mini chocolate chips over the granola evenly while it is still warm.

The trick. After several minutes, fold the granola with a spatula to distribute the melted chocolate chips.  Just gently, you don’t have to really stir it up.  This will stick chunks of granola together.

Let cool thoroughly until the chocolate has had a chance to harden up.  It will give you clumps of granola with bits of chocolate.

Delicious!  The granola itself is very lightly sweet.  The chips are what make the granola.  It got a thumbs up from John!

Entire batch of granola:
Calories 2,396.0
Total Fat 68.1 g
Total Carbohydrate 348.8 g
Dietary Fiber 31.8 g
Sugars 170.9 g
Protein 39.5 g

I would have to sit down and really measure, but it is probably fairly typical granola at about 200 calories per 1/2 cup.

Recipe Tuesday – cooking a pumpkin!

Okay, I know that most of you (myself included) just buy canned pumpkin already done.  But if you should happen to come into possession of a pie pumpkin, the effort it takes really makes a tasty difference!

I will admit here that I never do this.  John always does the pumpkins, but I happily consume the end result 😀

You can actually cook the pumpkin in different ways: Microwave, steaming, or pressure cooker.  John decided to do the microwave since more people have one of those than a pressure cooker.

Find yourself a large knife and get ready:

Cut the pumpkin in half:

Remove the seeds.  An ice cream scoop works really well for this:

Once the seeds are removed, cut the pumpkin up into wedges to fit into a microwave safe bowl:

Put water in the bottom of the bowl, maybe 1/4 cup or so and cover with plastic wrap:

Put in the microwave and cook on high.  This pumpkin was kind of thick and took about 20 minutes.  This is why the pressure cooker is great, because it is much faster.

When the pumpkin is soft and tender, let it cool for a bit before handling.  Then scoop out the cooked pumpkin from the shell. The same ice cream scoop still works pretty good:

You can use the pumpkin at this point, or you can make it like the canned stuff by putting it in a bowl and applying the spurs to it.

You can also use a food processor for this part if you want.

Beautiful, fresh pumpkiny goodness!

This can be used like any pumpkin puree – like in a pie:

Or pumpkin custard oats:

Give it a shot sometime.  It’s not so hard! 😀

Cranberry Orange Pancakes

This was an experiment that turned out pretty well!  You know normally I make the protein pancake mix with cottage cheese and oats, but I decided on a real flour one today.  And since it is fresh cranberry season – I wanted to incorporate those as well!

The ingredients:

  • 1/2 cup of fresh cranberries, coarsely chopped
  • 1 tablespoon of orange juice concentrate
  • 2 tablespoons of liquid egg whites (or 1 fresh egg white)
  • 1/2 cup of buttermilk
  • 1/2 tsp of vanilla
  • 1/2 cup white whole wheat flour (60 grams)
  • pinch of salt
  • 1/2 teaspoon cinnamon
  • 1/2 teaspoon of baking soda
  • 1/4 tsp of baking powder

In a medium size bowl, combine the chopped cranberries, OJ concentrate, vanilla, egg whites and butter milk.  Combine thoroughly.

In another bowl, mix all of the dry ingredients.

Add the dry to the wet (yeah, backwards, but whatever).

Mix until it just comes together.  Some lumps will be there, but that is okay!

Set aside and heat up your pan on medium heat.  This batter will need a little longer to cook, so lower heat than normal for pancakes so they don’t burn. Trust me.

You will notice as the batter sits for the 5 minutes while the pan heats up this it will become light and airy.

Measure out a scant 1/2 cup (or generous 1/3 cup) for each pancake.  I can only do 2 in this pan.  Cook until bubbles form on the surface.

Again, this is a delicate batter, so take care in flipping them.  Oooops.  Note to self – use wider spatula.

I also learned here was where to use lower heat than usual for pancakes.  The second 2 pancakes got a little dark.

Stats for the pancakes without any toppings.  For the *entire* batch of 4 pancakes:

325 calories, 2.2 fat grams, 55 grams of carbs, 8 grams of fiber, 18 grams of protein.

Nice, eh?  So if you have 2 pancakes, you can enjoy some real maple syrup on them and toasted pecans, like I did.

I think maybe a heartier flour like oat would maybe make the batter a little less fragile.  I am not sure how this would be in the waffle iron, but that could be an experiment for later 😀