Category Archives: recipe

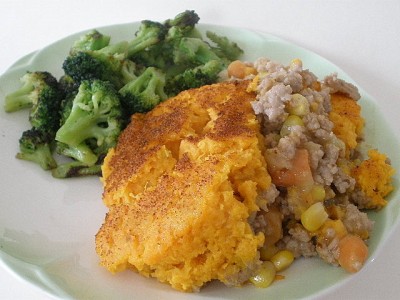
Sweet potato shepherd’s pie

Happy St Patty’s Day!

It is a gorgeous sunny day out.  I got up and did some work before eating breakfast.  Productive much?  Sometimes I can be!  After a while, I cooked up a 1-minute muffin with the standard blueberries and coconut butter!

I think I ate this the other day, too.  I’m going to start losing readers if I don’t change things up LOL!

After breakfast, I went out for a nice walk.  It was a little chilly, but I just wanted to be outdoors in the sun!  It is weird that it is getting so warm and there is still so much snow on the ground.

I got wearing my green today.

Not sure why my collarbone looks all whackadoodle in this picture. That freaks me out a little.  Wish I could bring some of the padding from :ahem: down below to pad it up a little.

Lunch time included some egg salad!

I had frozen some peanut flour waffles and used a couple of those for bread.  I have to say I think the peanut flavor (although subtle) got in the way here.  Next time I will use regular protein waffles for the bread.

My mother stopped over with some irish soda bread from Rock Hill Bakehouse!

Filled with currants and caraway seeds. We had coffee and shared the bread after I toasted it. Nummers!

Dinner to celebrate is a shepherd’s pie with a twist! This is based on Rachael Ray’s version

Sweet Potato Shepherd’s Pie

  • 2 medium sweet potato peeled and cubed, 1 pound (450 g)
  • 2 tablespoon cream cheese
  • 1 large egg yolk
  • 1/2 cup low fat milk (1%)
  • Salt and  pepper
  • 1 tablespoon coconut oil (or other oil)
  • 1 pound lean ground pork
  • 1 carrot, peeled and chopped
  • 1/2 cup diced  onion
  • 1 tablespoon butter
  • 1 tablespoon  flour
  • 1/2 cup chicken or veggie broth
  • 1 teaspoons Worcestershire sauce
  • 1/4 cup frozen corn kernels
  • paprika

Directions

Peel and cut sweet potatoes into large chunks.  Place into a steamer basket and cook until fork tender (10 minutes or so)

While potatoes cook, heat a large skillet over medium high heat. Add the pork. Season meat with salt and pepper. Brown and crumble meat for 3 or 4 minutes until cooked.  Place into a small casserole dish.

Add coconut oil to pan. Add chopped carrot and onion. Cook veggies for 5 minutes or so, stirring frequently.

Add in the butter and once it melts, sprinkle the flour on top and stir for a couple minutes. Whisk in broth and Worcestershire sauce.

Thicken gravy 1 minute.  Add corn kernels.  Add gravy  and vegetables to the meat in the casserole dish and mix.

Drain potatoes and put them back in the pot.  Mash well and add the cream cheese and the milk.  Mix well.  Quickly stir in the egg yolk.

Preheat broiler to high.

Spread the sweet potatoes over the meat mixture in the casserole dish.  Sprinkle paprika on top.

Broil 6 to 8 inches from the heat until potatoes are evenly browned, about 10 minutes.

Serve!


This makes 4 really generous servings.

Stats (as best as I can get them): 415 calories, 19 g of fat, 35 g of carbs, 26 grams of protein.

Uber filling.  I think you could probably get at least 5 servings out of this and knock the calories down for each one.  The only thing I would do differently is to cook the carrots in the microwave a little beforehand to soften them up more.  They were pretty firm.  Otherwise, A+!

Hope you all had a green day! :mrgreen:

Easy coconut flour crust

Friday! Yay Friday! This has been a very busy week around here. I am glad to get to the weekend. I got up in below zero weather – can this end any time soon, please?!!?

The gym was busy this morning with a lot of grunters. Super amount of testosterone today concomitantly with hearing songs like “Panama” and “Dirty Deeds Done Dirt Cheap.” Gotta love those days.  🙄 That is when it still feels a little awkward to be the only woman in the free weights area.

Exercise Set/rep/weight Muscle worked
Stationary Lunge 3 sets of 10 each leg holding 35# plate Lower Body
Dumbbell Pull Over 3 sets of 10 with 25 DB# Back
Dumbell Incline Fly 3 sets of 10 with 12# DBs (24# total) Chest
Captain’s Chair 3 sets of 10 Core
Calf Raise 3 sets of 10 at 170# Calves
Good Mornings 3 sets of 10 with 55# bar Low Back and hammies
Lateral Raise 3 sets of 10 with 8# DBs (16# total) Shoulders

Just a nice quick workout today. I forgot to drink my protein before I left the house, so I was pretty hungry and ready to eat!

Pumpkin oats topped with 10 g of cranberries, a drizzle of honey and coconut butter. Yum, yum, yum!
Got to work this morning first off, which was nice and was able to get a lot out of the way.  I was hungry a little early and snacked on a few of these:

Then I made some lunch.  This was some shrimp sauteed in some BBQ sauce on a toasted magic roll.  And how about that side of sauteed spinach?  You don’t see that very often on the blog.

I am not sold on the spinach.  I wanted it crispy for some reason.  Guess I could deep fry the leaves? 😯

Thanks for your thoughts on yesterday’s running thoughts.  Total irony after I write that post and then today I get a brochure for a new race coming up in April :mrgreen:

I am just not sure what I will do.  What I have found, though, is that my knee has been feeling pretty good this week and I have not run at all.  Maybe that says enough, eh?  I’ve still got my lifting and my biking!

My happy time today:

Here are a bunch of soap logs for the custom order I am working on.  I am about 3/4 of the way finished with it.  I need to  get this done and think about production again.

So tonight’s dinner includes a new item that arrived yesterday – coconut flour!  I thought I would dive in with a crust.  This would be gluten free, btw.  I used the recipe from Tropical Traditions

Ingredients (short list always a plus!):

  • 8 oz part skim mozzarella cheese, shredded(2 cups)
  • 2  eggs
  • 2 tablespoons flax meal (13 grams)
  • 2 tablespoons coconut flour (14 grams)
  • ½ teaspoon baking powder

Preheat oven to 350 F.  Line a baking sheet with parchment paper (foil might work as well if you spray it with nonstick spray)

In a large bowl, mix all ingredients together.  You will have to mash a bit to combine everything.

Then spread onto the parchment paper into whatever shape you want at about 1/4 inch thick.  I chose kind of a rectangle.

Bake for 15 minutes, remove from oven and flip over.  I needed to use 2 spatulas to do this.

Bake for another 15 minutes.

Check it out!  I flipped it back over again because it was prettier.

At this point, you can add whatever cooked toppings you want and put back in the oven to heat up if you want to have a pizza with it.

We had cooked ground pork and Pizza Quick sauce (yes, that stuff). I used up all of the cheese in the crust, so none available for the top!  Note to self, get more cheese.  So this was more like an open faced sloppy joe.

This was kind of a cross between a cheesy breadstick and foccacia.  I liked it.

Like that nibble I took out of the corner?? :mrgreen:

Calories for 1/4 of the crust only (my size piece shown): 225 and 6 grams of carbs.  Maybe more than regular pizza, but then again, this was a big piece. Quite tasty and not doughy or heavy feeling.  I think it would make good sandwich bread.

I am so glad it is Friday.  We have a busy weekend on tap.  Renovations and hosting a Mardi Gras dinner on Sunday. Laissez le bon temps roulez!

Question:  Are you a spinach fan?

Magic Rolls – Eades Low Carb Comfort Foods

You all know I love my bagels and bread, so on the lower carb days I was just not having any bready type things.  I have made oopsie rolls in the past, but they are a little fragile.  Then I came across this cookbook at the library (and I do like Dr. Eades blog).
The Low-Carb Comfort Food Cookbook

This is their recipe for magic rolls.

They remind me very much of pate a choux (aka cream puff dough), only less flour (replaced with gluten) and they don’t get a big air pocket in the center.

Ingredients:

  • 3/4 cup plus 2 TBSP of water
  • 6 TBSP of butter (3/4 stick)
  • 1/4 cup of white whole wheat flour (or any flour, really)
  • 3/4 cup of vital wheat gluten (Bob’s Red Mill)
  • 3 eggs
  • pinch of salt (my addition)
  • 1 egg white (optional)

Heat oven to 425 F.  Line 2 half sheet pans with parchment paper.

Mix water (3/4 cup + 2 tbsp) and butter in a saucepan over medium heat until butter melts and simmers.

In a bowl, mix together the gluten and the flour.  Add a pinch of salt if desired.

Add this mixture to the pan and stir and mash until all of the dry material is absorbed.

Remove from heat, let rest for a couple minutes, and beat in the eggs one at a time.

It will seem lumpy after the first egg, but don’t worry about that.  Don’t use an electric mixture or you will work too much air into the batter, although a paddle attachment of a stand mixer would work on slow speed.

More egg added:

After mixing in the eggs, the batter should be somewhat stiff, but soft.

Here is where the optional egg white comes in. If the batter is too dry and really stiff, add the egg white.  If the dough mounds well on a cookie sheet, don’t add the egg white.  I did not need to add it.  I think it depends a little on the size of the egs.

Using a disher or spoons, mound the batter onto the cookie sheet into 6 mounds on each sheet pan for a total of 12 rolls.  I used a small disher and did 2 scoops for each roll.  I think that is just shy of 1/4 cup?

See how it settles a little, but still holds it shape and doesn’t spread out much?  That is what you want.  I lucked out on my first try!  Leave space because they get big in the oven!

Bake at 425 for 25  minutes.

I was really surprised to see these all puffed up!

Remove from oven and move to a rack to cool.  If you don’t eat these all the same day, freeze the rest in a zip bag.

This is one sliced open:

Fun, eh?  John had one toasted with butter and he loved it!  I was surprised that he liked them so much.  I can see doing a lot of fun things with these, like making a danish or french toast.  Or even adding something like parmesan cheese and spices to the batter before baking.

Nutritional stats:

Based on making 12 rolls per batch (egg white included in this calculation):

Calories: 107

Fat: 6.8 g

Carbs: 3.3 g

Fiber: 0.3 g

Protein: 7.9

These seem pretty much like a danish or cream puff in texture.  They are sturdy enough to be used as sandwich bread:

Split and toasted with cream cheese.  I think I liked this best:

This could easily be turned into a dessert as well.  Definitely a keeper recipe.

Chicken with Balsamic Tomatoes

It was below 0 when I got up this morning to go to the gym. Enough already!  😡 I am really getting antsy for spring. I warmed up and then did the weights.

Exercise Set/rep/weight Muscle worked
Lying leg press 3 sets of 10 at 110# <—increase Lower Body
Dumbbell pull over 3 sets of 12 with 20# DB Back
Captain’s Chair 3 set of 10 Core
Incline Chest Fly 3 sets of 10 with 15# DBs (30# total) Chest
Calf Raise 3 sets of 10 at 170# Calves
Good Mornings 3 sets of 10 at 55# Low Back and hammies
Upright row 3 sets of 10 with 30# bar Shoulders

The gym was crowded today. Well, crowded for my gym at any rate. Tuesdays are normally very quiet, but I think people that didn’t come yesterday because of the snow came today.

Came home to peanut flour waffles!

I am totally addicted to the peanut flour, so I think I will have to order some online and stock up.  Or drive 3 hours to a Trader Joe’s.  Road trip!!!

You know, lately I feel like life has been in such flux, especially since I lost one of my jobs in January and then I changed up my workout schedule.  Now things just seem… unsettled.  I can’t put my finger on it because nothing really has changed outwardly in any drastic way, but I feel like I am waiting for something to happen, but I don’t know what that is.  Guess I am supposed to make something happen, but I don’t know what that is, either.  And I am a little tired of thinking about it.

Anyway, I also had some trouble thinking of lunch.  Didn’t feel like eggs and today is a lower carb day.  Chicken on the menu for dinner already.  So, mish mash – welcome to the table!  I split open a magic roll, toasted it, and did half almond butter and half cream cheese.

This was good, I have to say.  Plus a perfectly ripe pear.  Filling as well – yay fat!

Not much work this morning, which means pile it on later in the day.  Sigh.  Part of that unsettled feeling.  John made up the lattes this afternoon.  I am loving the new Saigon cinnamon.  Sprinkle, sprinkle!

and peanuts:

I planned out dinner tonight with the thawed chicken breasts.  We decided on the Chicken with balsamic tomatoes from ReadySetEat.

  • 2 tablespoons oil (we used coconut)
  • 4 boneless skinless chicken breasts (4 oz each)
  • 1/2 teaspoon garlic salt
  • 1/4 teaspoon ground black pepper
  • 1 cup sliced onion (we used 1/2 cup diced)
  • 1 can (14.5 oz each) diced tomatoes, undrained (they recommend seasoned ones, but we just had plain)
  • 1/2 cup balsamic vinegar

Heat oil in medium skillet over medium-high heat.  Sprinkle chicken with garlic salt and pepper; cook chicken 5 to 7 minutes or until browned, turning once. Remove from skillet; set aside. Add onion to skillet; cook 1 to 2 minutes over medium heat or until crisp-tender.

Add undrained tomatoes and vinegar to skillet; bring to a simmer. Return chicken to skillet; cook 10 to 12 minutes more or until chicken is no longer pink in center.  I added some dried basil and oregano to this.

The only thing I added different was when the chicken was done, I added a couple teaspoons of cornstarch mixed with a couple tablespoons of water to thicken the sauce a little bit.

They recommend serving with pasta (which John had), but I had mine with broccoli!

Serves 4

Calories: 226

Fat: 9.3 g

Protein: 23.2 g

Carbs: 12.4 g

This was quite good and very easy.  I think I might cut down the vinegar a bit next time or get a better quality one :mrgreen:   We have leftovers, so you will see this tomorrow!

We were supposed to go out for coffee tonight, but with all the late work – somebody is working at nighttime.  3 guesses as to who that is…

Guess I will make some decaf for home sipping.

Question:  Ever cooked with balsamic vinegar?

Bagels and building permits

It’s Wednesday, so you know what that means!  I was up raring for a bike ride.  If only it could be outdoors.  It was 2 degrees out this morning, so that just wasn’t happening LOL!  I hopped on the trainer for 10 miles and read.  I have to say I am loving reading while on the trainer.  The time goes by so fast, and I don’t lose speed (which is what I was worried about).  I just have to be careful not to drip sweat on my reading material. 😳 Then we were off to bagels!  Carb up day today.  I had a wheat bagel.  These are made locally and tasted very fresh.  Nummy. I was sad when it was gone.  We also stopped afterward at the county building and are given the go ahead to start on our laundry room remodel!  I am so excited to start ripping it apart.  😈  We are walling off this portion to a separate room and adding a toilet and sink. Then this part will become a pantry with doors so anyone who comes to visit doesn’t have to look at all my oat products. Of course, things could possibly come to a screeching halt once we open up the floor and see what has to be done to put in the waste pipe.  With a 100+ year-old house, you just never know.  But I shall be optimistic. 😀  This should make for some good blog fodder, at any rate.

Lunch time!  Laughing cow egg/egg white omelet.

I split a pear with John.  He asked if I wanted half, so I decided to have that. I should have had a whole one because I wanted more 😀 Then I had some nuts. I am starting to crack out on these.  Must be careful.

<insert whine> I got stuck with one of the worst dictating PAs for work today.  I am not sure why, but I judge the quality of their work based on the quality of their dictations.  I figure if they consistently dictate sloppily, rushed, or just poorly – then that is someone I will avoid going to them for medical care.  Isn’t that weird?

Two of my favorite things for a snack today: Only a few more months until I can pick my own!

John set up to make coconut chicken curry for dinner tonight.

From this recipe.  Changes are lined through.

Coconut Curry Chicken

1 ½ cups white rice brown rice (ours was already cooked and frozen)

2 teaspoons curry powder

One (13.5 ounce) can coconut milk

4 skinless, boneless chicken breasts, cut into strips

2 teaspoons five-spice powder

1 jalapeno, chopped (seeds removed for milder flavor) didn’t have

½ large white onion, finely chopped

Salt

Pepper

In a medium saucepan, bring 3 ¼ cups salted water to a boil. Add the rice, bring to a simmer, cover and cook for 20 minutes. Meanwhile, in a small saucepan, heat 1 tablespoon olive oil over medium heat. Add the onion and cook until translucent. Stir in the curry powder and cook for 1 minute. Add the coconut milk and jalapeno and cook until reduced by half, about 7 minutes. Toss together the chicken, five-spice and ½ teaspoon salt and ½ teaspoon pepper. In a large, heavy skillet, heat 2 tablespoons olive oil over medium-high heat until shimmering. Increase the heat to high and stir-fry the chicken until just cooked through, about 6 minutes. Stir in the coconut sauce.

I had mine with sauteed brussels and no rice.  Sprinkled with a few cashews on as well.  Easy and tasty!

Now I am off with my mom for a lecture at the library (not the library!!) on perennials.  Should be fun! thinkspringthinkspringthinkspring

Question:  Are you handy around the house?

Homemade coconut butter

If you have ever shopped Whole Foods or Trader Joe’s, you have probably seen Coconut Butter.  Of course, those of us in dinky towns that do not have a Whole Foods or Trader Joe’s can either order online or do without.  Well,  I decided I didn’t want to do without anymore, and I was so not ready to fork out $13 for a jar plus shipping.  I had seen a lot of blogs where people made their own, so I thought I would give it a whirl.  And so the adventure began.

Ingredients:

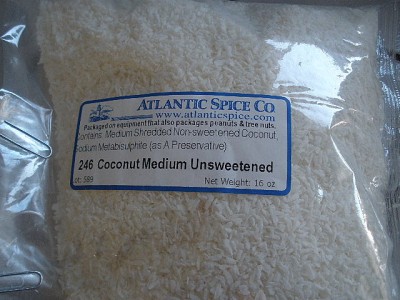
Easy enough.  Note – *do not*, repeat *do not*, use sweetened coconut flakes.  They will never make butter as they are too soft and moist.  We have a small store that sells unsweetened coconut, and it is actually quite inexpensive.  Or, I order it from Atlantic Spice (sister company  on the west coast is SF Herb Co) when I am ordering my hugejass bags of cinnamon 😀

I measured out 8 oz of coconut and put it into my mini processor.  This was mistake #1, as it was too much for my tiny processor.

It was happily whirring away, and I knew it would likely take 15-20 minutes, so I waited.  It became fine and almost looked like it was going to ‘butter up,’ but then it kept getting stuck.  I did not want to overload the processor, so I thought the blender would work.

Transfer to blender = losing about 1.5 ounces on the counter and floor.  Sigh.

I turned on the blender and it started to blend, then got stuck and unstuck.  Then I smelled burned rubber.  😯   Okay, time to evacuate!

I took it back over to the processor and decided to batch it.  And voila!  That started to work.  It was getting creamy, and I kept adding more in.  You will need to stop and push the coconut down periodically.

Once I was done with the whole shebang, 30 minutes had elapsed.

The result?

Nice! It is not a totally smooth texture, but the coconut flavor is ah-mazing.  It almost tasted sweet, too!

What to do with this stuff?

Or, you could put it on oatmeal or on toast or even on something like chicken or fish!

Note this will become solid at room temperature (depending on how cold your house is).  Just heat it up for about a minute in the microwave or scrape out what you want and let it melt.  The fat from coconut oil is a medium chain fatty acid and actually quite good for you, unlike what the CSPI says.

My tips for making this would be:

1. Don’t use the coconut straight from the fridge.  Let it come to room temperature so it won’t take so long.

2.  Start the blending in small batches.  This was tougher than even almond butter, for some reason.

3.  Most important – Be patient.  It can take up to 1/2 hour to do this.

Homemade Cacao Bliss:

Following my own tips above, I made another batch.

This time with cocoa powder and honey.

Ingredients:

  • 8 oz of unsweetened dried coconut
  • 1 tablespoon cocoa powder
  • 1 tablespoon of honey
  • 2 tablespoons coconut oil

This batch I was smart and processed a couple ounces at a time.  This does take a while.  I would say about 30 minutes of processing, stopping and pushing the coconut down periodically, so plan ahead if you want to make this.  Maybe it would be different in a super duper processor and not my little mini.  Someone needs to let me know 😀

After the coconut has ‘buttered’ – add in the cocoa powder:

Put the lid on and process.  You could just leave it at this point if you want.  I drizzled in a tbsp of honey:

This seized it up a little bit, so I added about 2 tablespoons of coconut oil to help smooth it out.  Not sure why the honey did that, but I find that happens with nut butter as well.

Kind of like a melted Mounds Bar.  Yes  it is.  Approved by John!  I think you can be safe to use the nutritionals for Artisana coconut butter for this, which is 92 calories per tablespoon.

Enjoy!

All buttoned up with Chicken Corn Chili

This is one of those days when I am so, so glad to work from home.  We are lucky to be above the sleet line and have all snow up here.  Of course it is a lot of snow!

John went out twice with the snow blower to keep it under control while I worked.  He is gunning for his 15 straight win of Husband of the Year.

I made a warm and comforting breakfast to start the day.  I did cream of wheat (with egg whites whisked in) topped with the apple/cranberry topping, which I made with raisins instead.

This is in lieu of Bagel Wednesday as we just couldn’t get out.  Hopefully Thursday!

I had some munching problems early in the day.  I was very hungry for some reason.  I tried to get extra protein with lunch with a double dose of tuna:

Kiwis are back!  Yippee!  I also actually had probably another entire serving of these pretzel thins while making lunch.  Just to be honest here. 😳

Then I went out during the afternoon break in the snow to skim off the driveway and sidewalks. This is our front walk.

I think there is a yard under here somewhere:

There really is nowhere to put the snow!

Bobsled chute:

Yay – I am so happy to be shoveling 😀

I look irritated, but I actually am not.  My eyes are sensitive to brightness. Even on a cloudy day, the snow is bright enough to make me squint, which produces what we have affectionately named “the divot” between my eyebrows that is permanent.

I was ready for this when I came in!

Weather like this calls for some warm and tummy filling chili.  In my effort to do more recipe cooking this month, I decided to make the Chili with Corn, chicken, and chipoltes from Sunday Soupby Betsy Rosbottom.  I made some modifications to this,including using already cooked chicken, not adding beans, and reducing the recipe size.  Changes I made are marked with an asterisk.

  • 1-1/2 tbsp of oil (I used coconut) *
  • 1/2 cup of chopped onions (which I pureed) *
  • 1/8 cup of flour
  • 1 tbsp chili powder
  • 2 tsp ground cumin
  • 1/2 tsp salt
  • 3 cups of vegetable broth *
  • One 15 oz can of chopped tomatoes, drained
  • 2 chipotles in adobo sauce, chopped (I divided a can of these up and froze portions for convenience).
  • 2 cups of frozen corn kernels
  • 6 oz of cooked chicken breast, chopped *

Heat the oil in a soup pot and saute the onions until lightly browned (several minutes).  In a small bowl, mix the flour and spices together and sprinkle over top the onions.  Stir and cook for 1 to 2 minutes.  Then add the broth slowly, whisking to make sure you don’t get clumps. Then add tomatoes and chipotles.  Bring to a simmer,cover, and cook until the mixture has thickened –  about 15 minutes.  Then add the corn and  chicken.  Cook for 10 more minutes until everything is heated through.  It helps if the corn kernels are thawed.   :mrgreen: Makes 4 servings.  Season to taste with salt and pepper if desired.  This is more like soup than chili, so if you cut down to 2 cups of broth, it would probably be thicker.  Each serving is about 2 cups!

Each serving has 216 calories, 6.5 grams of fat, 28 grams of carbs, 2 grams of fiber, 13 grams of protein.

This was really good.  It is quite spicy, so you may want to either leave out the adobo chipotles or reduce the chili powder a bit.  I like it hot.  John was getting sweaty, though! 😈

My work slowed down some as the clinic lost a lot of patients from the snow storm.  I now have time to do my 15 minutes of cleaning and some bike trainer riding.

Question:  What’s your spice level?

Recipe: Peanut Flour Waffles

So we have been playing with the Peanut Flour a bit around here.

The next stop?  Making protein waffles with them!  Normally, my protein waffles have an egg, cottage cheese, and oats as their base.   I had the brilliant (if I may say so) idea of replacing the oats with peanut flour!

Very few ingredients, which is always good for breakfast.

While the waffle iron heated up, I put the following into my bullet blender cup:

  • 1 egg
  • 1/4 cup of peanut flour
  • a lot of cinnamon 😉
  • 1/3 cup of cottage cheese (1%)
  • 1/4 tsp baking powder

If you want a sweeter waffle, add a sweetener of your choice, keeping in mind that I am used to unsweetened stuff.  Then I put on the blade and turned on the Magic Bullet Blender.  We have had this thing for probably 6 years now!

You can use a hand blender, mini food processor, or immersion blender.  You just need the batter smooth.

I then poured this into the waffle iron and let cook.  I did have a bit of waffle runoff, so keep that in mind.  Maybe a smaller egg or a little less cottage cheese would prevent that.

Voila!  Gluten free waffles.

These are topped with a banana that has been mashed with 1 tbsp of real maple syrup and warmed in the microwave.

The waffles came out fluffy and tender.  They didn’t stay real crisp, although they came out of the iron crispy.  The taste was good as well, and not super peanuty, which I thought they would be because the raw batter had a really strong peanut taste to it (yes, I ate raw batter with an egg).  They also smelled absolutely divine while cooking!

Stats for the waffles without topping:

This makes one batch of waffles for your iron, which is 4 squares, or 1 giant circle as mine does 😀

240 calories

9.5 g of fat

12.5 g of carbs

4 g of fiber

31.5 g of protein!!

The banana/maple topping adds about 140 calories to this depending on the size of the banana.

Another option for these is to use them as bread for sandwiches.  If you don’t sweeten them, they are perfect for savory dishes.

Enjoy!

Parnsip and butternut squash soup

I had a craving for soup over New Years, and for some reason a squash apple soup was on my mind. However, I did have parsnips available, so I thought “Why not make a squash and parsnip soup?”

Here is the result.

Ingredients:
1 tablespoon of oil of your choice (I used coconut)
1/4 cup chopped onion
8 ounces of parsnips (2 large)
2 medium apples
1 16 oz bag of frozen butternut squash (you could use fresh, I am lazy).
3 cups of vegetable broth
1/4 cup evaporated skim milk.
salt and pepper

In a large saucepan, heat the oil and add the onions and a pinch of salt. Keep the heat on medium as you want to sweat the onions, not fry them.

Chop the parnsips and apples (peeled).

Once the onions are translucent (5 to 10 minutes, or as long as it takes to chop the parsnips and apples), add the parsnips.

Cook for 2 or 3 minutes, then add the veggie broth.

Bring to a boil, then simmer for 10 minutes.  This is just to give the parsnips a head start on cooking. After 10 minutes, add the apples and the squash.  I would suggest you use a larger pot…

Bring back to a boil, then reduce heat, cover, and simmer for 20 minutes.  This may vary depending on how small you chopped the parsnips.  When the parsnips are soft, they will be translucent.  Not sure if you can see this or not.

Now time to put the spurs to it!

You can either batch process this in a blender or food processor if you don’t have an immersion blender.

After the soup is smooth, add in the evaporated skim milk.

This just adds the illusion of heavy cream.  Rewarm if necessary.  Add salt and pepper to taste and serve!

Good with crumbled crackers on top – or I bet a drizzle of maple syrup would be awesome!  This soup has a really full parsnip flavor to it, which is sort of like a carrot.  Tasty.

Makes 6 cups of soup.

Calories per cup: 139.1
Total Fat 2.4
Total Carbohydrate 24.3
Dietary Fiber 3.3
Protein 2.7

Recipe Tuesday – Cinnamon Raisin Bread

On Saturday, John was out of town and so I was left to my own devices with no car.  I have been thinking about making cinnamon raisin bread for a while now.  I have never done a rolled up bread before.  Normally we use the 5-minute bread method, but since I had a whole day on my hands, I wanted to do it the old-fashioned way.  Of course, I couldn’t leave any recipe well enough alone.  I wanted a lighter loaf than whole wheat, so I decided to do a half and half mixture.

Cinnamon Raisin Bread

  • 1/4 cup warm water  (100-110F)
  • 1 tablespoon active dry yeast
  • 1 cup 1% milk
  • 1/4  cup packed brown sugar
  • 1 1/2 tsp  cinnamon
  • 3/4 tsp salt
  • 1 tsp vanilla extract
  • 3 tablespoons of coconut oil, melted.  (you could just use oil)
  • 1-  1/2 cups unbleached all purpose flour, +1/4 to 1/2 cup for kneading
  • 1-1/2 cups white whole wheat flour
  • 3/4 cup raisins

Filling:

  • 1 tablespoon melted butter
  • 1/2 cup packed brown sugar

Set the raisins in a bowl and cover with very hot water to plump them up.

In a stand mixer (or large bowl) add the warm water and yeast:

Let this sit for 10 minutes until it is foamy.  You can use this time to assemble the rest of the ingredients.

The yeasties are all awake and active now!  Add to this mixture the milk (I warmed this a bit in the micro), 1/4 cup brown sugar, coconut oil,  cinnamon, salt, vanilla, and 1 cup unbleached flour and 1 cup of white whole wheat flour.

Mix until this batter comes together:

Now add in the other 1/2 cup of white flour and the other 1/2 cup of wheat flour.

Mix to incorporate.  Then switch to the dough hook:

If you don’t have a dough hook, you can turn this out onto a floured surface and knead for 10 minutes.  If the dough is super sticky, add in some of the reserved 1/4 cup of white flour.  You don’t want the dough really dry, it should be a bit sticky.  How much will depend on the humidity of the day.

If you have the dough hook, just turn it on and add the extra flour:

The dough will pull away from the sides of the bowl and the bottom.   After 10 minutes, drain the raisins and add them to the bowl. Please make sure you  drain the raisins.  Mix in.

I ended up having having to knead in some by hand.  Form into a ball and placed in an oiled bowl.

Cover with plastic wrap and let it rise in a warm place for about 2 hours until it doubles in size.  If your house is cold like ours, put the bowl in your oven with the oven light on.  That will give a tiny bit of heat.

We have liftoff!

I was all excited at this point 😀   Now is the time for filling and rolling.  Lightly flour a large surface and dump the bowl out.  Melt the 1 tsbp of butter and get a pastry brush.

Press the dough into a large rectangle approximately 10 inches by 14 inches.  It is quite easy to do this by hand, you don’t need a rolling pin or anything.

Brush the dough with the melted butter:

Spread the 1/2 cup of brown sugar evenly over the surface:

Roll the dough up from the short side.  Roll really tight:

Then drop seam side down into the a greased loaf pan.

Cover with plastic wrap and let rise for another 45 minutes to an hour.  Preheat the oven to 400, remove the plastic wrap and bake for 30 to 35 minutes.

I could barely wait for it to cool to cut into it and see how my first attempt went.  Is it bread?

Oh my yes….

There is only one word… wow.  This was soooo good!

Time consuming, yes – but therapeutic and so worthy.

Stats: If you cut the loaf into 12 slices:

Calories:  228

Fat: 4.9 g

Carbs: 47 g

Fiber: 2.4 g

Protein: 4.8

Definitely a dessert bread.  Totally worthy!