Category Archives: home improvement

Last weekend of rehabbing

Well, that weekend went fast.  Q turned out to be a bust and gave us mostly rain and a lot of crappy snow/sleet mix, but not a lot of accumulation.  It almost makes you not want to worry when they say storms because it’s over-hyped a lot.

Anyhoo, John helped me finish up the last bits of the bathroom.  We figured out my miter problem. The sides of the miter box were too short for the molding and the molding was concave, so that affected my cuts.  John ended up taking the pieces out and using the table saw to cut the corners, which I was happy about.  I hate using the table saw.  I always envision my fingers flying off, even though I use it safely. It just makes me nervous.   We took a break on Saturday and went to buy a couple accessories like a towel bar and a TP holder.  I almost got this one:

holders

Okay, I wasn’t even close to getting one of these. Too creepy. Can you imagine that in the bathroom with you?  😯

Then we stopped for some coffee in Saratoga at a new place called Spot Coffee.  It’s a very small chain (12 stores?) and one will be opening in Glens Falls early this summer.  Anyway, they roast their coffee on the premises.  I always trial a new place with a latte as the benchmark.

OLYMPUS DIGITAL CAMERA

Extra kudos for having “for here” cups when staying there.

It was quite good and way better than Starbucks.  Not quite as good as Coffee Planet, but I am excited to have them open up and hopefully be open late! That’s my biggest peeve around us is that Starbies is the only place open for coffee past 8 pm.

Sunday brought the ‘final’ fixing of the plumbing.

The plumbing issues I had earlier were mostly fixed.  It was just a lot of tightening over and over to get it right and stop the leaks. However, the old shut off valve just decided to break – after I got all the other leaks fixed.  Yay – not!!! Water was coming out just behind the knob, which meant a problem inside the fitting.

oldplumb

I will give you a brief plumbing lesson here.  As much as I whine about the plumbing, there are a ton of new products that make it very easy for a homeowner to fix.  There are things called Shark Bites or Quick Connect that use a pressure fit connection which just snaps on.  So easy and meets code in pretty much all states (except Vermont, for some reason).  So, this was what we had to do.  Water was shut off in the basement- do not forget to do this or you will be so sorry.

Then use a pipe cutting tool.

cutting

This just tightens onto the pipe and you turn it around and around. The wheel cuts into the pipe until the pipe snaps off.

OLYMPUS DIGITAL CAMERA

Easy peasy and a nice clean cut.  Then you just use the wedge on it to get rid of any burrs on the pipe.

OLYMPUS DIGITAL CAMERA

Next measure 3/4 inch on the pipe and press the new piece on until it snaps in place, making sure it goes to the mark. No glue, no soldering.

new connect

Voila!  $12 part and about 15 minutes.

Then connect and test.  It works perfectly – although now the old hose I connected sprung a very slow leak, so I have to get a new one of those.   🙄  It just never ends!  That’s happens when you try to reuse as much as possible. Sometimes it doesn’t make it.

Then the door handles on the vanity.

handles

I will do the full bathroom reveal on Wednesday, but here are a couple of sneak peaks.

floor

OLYMPUS DIGITAL CAMERA

It sure looks different! In a way, I will be sorry this project is done because it has really kept me active and also kept my mindless snacking to a minimum!  Bonus along with a new bathroom 😀

Guess I am gong to have to find a new project to do.  Or take a vacation 😀

Floors and Healthy Heart Weekend!

Thank you for all the pictures and reports from the Healthy Heart Weekend! Keep ‘em coming!

My mother joined me for Bagel Day this morning since John is out of town and I saw this ad in the paper. Perfect for the HHW!

P2170052

Paging Dr. Coffee

I dropped John off on Friday at the airport. He is in Las Vegas. I thought about going as well, but I am not all that interested in Vegas and I would just be wandering by myself since John and his friend were going for poker.  Not worth it for me to go. Plus I had rehab to do!  John’s friend invited him and paid his way there – so how cool is that?

So, while that cat is away, so to speak, I roared my way through rehab. Apologies for the ton of photos. On this week’s installment of This Old House, I got the new Tile Transformations up.  Now my tub is white again!

P2160027

I looks so much better than blue!  I also put the stone finish coating on.  This was the step I didn’t do when I got a blue shower.

P2160031

You mix these together and then roll it on.

P2160032

It’s a very thin coat. I will have to get a close up of a tile to show the finish.  I am quite pleased with how the shower came out.  I did smudge a small spot when I stumbled in the bathroom and hit my knuckle on the wall. You can barely tell, but I know where it is. :D   I am so happy to have the shower finished!  Go Lori!!

P2160040

Sorry, unshowered here (obviously).

Saturday afternoon brought the flooring.  This is the vinyl plank flooring.  It was pretty easy to install. It’s a floating floor like laminate, but easier to use.  The pieces have adhesive on them and they overlap by an inch on all 4 sides.  You just use a straight edge to cut the planks:

P2160042

(The gray is the adhesive strip). Then bend until it snaps.

P2160034

To install, you just butt the edge up to the previous plank and roll the plank down. This is the easiest way to get a tight seal.

P2160036

The only annoying thing is the sticky. I kept kneeling on it, or bits would get stuck to my feet or hands. Here I was about halfway through last night.

P2160043

Note the coffee cup! Can’t work without it :D  The installation went fast and by the time I stopped last night, I only had the last 3 planks to lay down, but those involved a lot of cutting, so I left it for this morning.  I tell you – I burned a lot of calories this weekend. Not to mention not snacking much. I was on a roll and didn’t want to stop.

After breakfast with my mom, I finished the last 3 planks. The nice thing about this product is that you can cut it with tin snips and get nice tight-fitting cuts.  Like around the water inlet:

P2170061

The floor is fairly seamless. You can see just a few seams here and there, kind of like with laminate. I do like the look of it, though.


P2170054

So happy to get the floor in without any huge mistakes!  I made a couple cutting errors, but I had enough extra to make up for that.

P2170060

We will have to see how it holds up.  I don’t know if I would trust this flooring in a high traffic area with lots of furniture moving around and such.  The bathroom is fine since we aren’t shifting anything around in there (or I hope we don’t!).

I won’t even get into the rest of the day.  Since John was gone, my dad came over to help me move the vanity into the bathroom and put the sink top on.  (Thanks dad!!!) I’ll save that for another day.  I *love* the vanity, although putting in the drain is giving me a bit of vexation and I think I need a trip to the hardware store. But, the toilet and shower are functional again.  Two out of three for now.

I have to say that I am really beat.  I can’t believe tomorrow is Monday already.

Bath reno update

Countdown to Healthy Heart Weekend!!  Don’t forget to sign up. We can always use more participants so help spread the word!

hhweek


I am in praline recovery mode today. Ooof!  I need the Healthy Heart Weekend!

The bathroom is coming along nicely. I spent the week prepping the walls since I couldn’t move forward without the flooring. There were the drywall replacements to make, plus giving a skim coat of drywall compound and smoothing it out. Lots of sanding and dust making.  Probably one of my least favorite jobs because it is never ending with all the little nicks and marks. You could work on it forever, really.

I had some trouble deciding on paint colors to go with my gold.  Martha Stewart had some coordinating colors, but they weren’t really speaking to me, plus her paint is really expensive.  Guess the name Martha Stewart adds $15 to the cost of a gallon of paint?  I needs me some of that power.

Anyway, I went with my gold paint swatch over to the Glidden section and found 2 colors.  I needed the upper wall and ceiling paint, then the below the chair rail paint.  There is going to be a white chair rail and white trim around the door and windows, so I didn’t want the upper color to be white – plus I had to paint it anyway because of wall damage. I taped off the mirror.  Here are the before paint walls.

P2090017

You can just see the line in the corners where I cut in the new color. Klassy light fixture, too, right?

P2090020

Below the chair rail is a color called Whispering Wheat.  Above the chair rail is Creamy Buttermilk.

wheat  buttermilk

Two coats of paint.  The line is uneven because there will be a chair rail and I didn’t have to be precise. Hooray for sloppy paint job!

P2100013

I wish the lighting was a bit better.

P2100016

I hate to think of how many shots of this toilet has now been on the blog!  Here is a note to any rehabber. If you take the tank off to paint and then put it back on, it is very important that you tell your spouse if you don’t have the tank bolted in place.  I didn’t tell John because he was out at poker and came back very late after I went to bed and the tank came loose and got water on the floor.  Ooops! Embarrassed

Now the blue color of the tile is *really* apparent.

P2100014

White Frost, my ass.  I will give huge kudos to Rustoleum, though.  I got a refund check from them on Saturday for both kits.  That was very fast! So – good on them and I do recommend the transformations. Just don’t get Blue White Frost. Now I need to get another 2 kits of plain old white and do that this weekend.

Then the Froth metallic paint will be the stripes. I did a test board to try out the stripes and see if I liked the gold.


P2100020 This is really hard to capture with the camera. It’s a very subtle look and exactly what I was looking for! It all depends on how the light hits it, too.

P2100018

Now I need to get the stripes done. You have to wait at least 24 hours for the base coat to really dry so you don’t pull it up when you tape off for the stripes.  Plus I have to work and all that.  I also got a call today that my flooring came in early!  Woot!  I am going to have this bathroom done in a week (fingers crossed big time here). Maybe not with a shower curtain yet, but that is the easiest thing to install – just hard to find.

I can’t wait because I am really tired of using the downstairs for tooth brushing and drying my hair. It’s getting old.

Reno continues

Guess what I spent most of the weekend doing?  If you guessed bathroom demo – you win a Cupie doll!  I really needed a good block of time to get the tile off the wall and floors.  I wanted to do it in one shot and get it cleaned up so we could still get in there and shower on Sunday morning.

As I think I mentioned before, the tile on some of the wall popped right off.  Turns out whoever built this bathroom used 2 different kinds of drywall, one is the greenboard kind, which the tile came off of.  The other was normal dry wall and pulling the tile off pulled out the drywall as well, which meant that had to be completely torn out. That is this wall:

P1200022


Ooops.  That is not what I wanted to happen, but such is life in renovating.  In a way, this made it quicker to demo because I just cut through the dry wall and pulled off sheets with the tile on it.  I had to have John help carry these downstairs because a wall of tile is heavy!

P1260023

This was the wall behind the toilet.  I thought I was going to have to take off the toilet tank, but we were able to lift the wall piece up from behind it.  I was  sweating a lot from this workout. See that dirty spot was the part the toilet sits in front of.  All the placed you never think to clean that get exposed Embarrassed

Two of these and that was one wall of the bathroom. 

Then it was removing the floor tile. I used a hammer and chisel and it went pretty fast.  There were sections where I hit one tile and a dozen popped off the floor.  Yep, quality work in the 1980s, I tell you.

I also see why our floor tile was cracked near the sink. See this? It’s uneven flooring.  2 pieces of underlayment and one is about 1/8 inch lower than the other.  They tiled over that and the fracture line in the tiles followed this as you can see below. 

P1260020

They just tried to level it with mortar, which does not work. This does make retiling problematic with an uneven floor.  Even with leveling compound I am not sure I would trust it.

Plus – I have decided that I do not like grouted floors.  It’s hard to keep clean.  So, we are going with a resilient vinyl plank flooring.  It will smooth out the unevenness, it’s waterproof and easy to install (so they say).  I am going to try a cork finish. I have always wanted a cork floor, and this actually looks really neat in person.

cork

Anyway, remember how I said things look really bad before they get better?  Enjoy this view.

P1260022

EEEEEK!  (I was kneeling on that towel to protect my knees, so I just dropped it there when I finished). I was so happy to have all the tile up that I barely noticed the mess.  John looked a little shell-shocked when he saw it. 

P1260021

However, once I cleaned all the tile up and gave it a vacuum, it was presentable again. And functional, still. The tile under the toilet will remain until we do the floor.  Just to make like easier.

P1270029

Sunday was sink removal.  It was a bit awkward, but not as bad as I was envisioning – and a lot easier than all that tile!  I hated this vanity, too. 

P1270030

Pixie wanted to help. She was a pain wanting to be around with all the activity this weekend. 

P1270034

Not safe for kitties,though, so we tried to keep her out of there.

I am so glad to finally have that ugly beast out of there.

P1270036

I have very specific parameters for a vanity.  I want drawers. The problem is most stock vanities have the drawers on the right. The way our plumbing is (as you can see above), we have to have the drawers on the left. I am not interested in ripping up the floor to replumb all that.  What a pain!  It was either buy a smaller vanity for the sink and then get a drawer cabinet on the side, which is hard to get matching – or I decided to bite the bullet and pay a little more for the vanity. Since we are saving money by not putting up bead board and the flooring will cost half of what it was going to, I am indulging in the vanity.  This is the one I am 95% sure I will get.

QUADRO

One drawer for John and 2 for me! Oh go on  It’s a little more than I was going to spend, but it has what I want. This will change the color scheme a little bit for the room.  I think the burgundy is now out, but I am going to do a cream with gold metallic finish stripes and a cream colored shower curtain.  With the ‘cork’ floor, I think this will be a warm and maybe a little lux looking bathroom!  Or it could be a mess LOL.  I am a little overexcited about it, though. Poor John!

Now it’s time to put Humpty Dumpty back together again.  The worst part is over, thank goodness.

We are now teeth brushing and contact insterting in our downstairs half bath.  We never could have done this project if we hadn’t put in the downstairs bath. At least we can still shower upstairs, or shower at all, really.

I am thinking about 2 more weeks on the bathroom and we might be done!  Drywall patching this week. Next weekend will be the Tile Transformations for the tub surround. 

Reno begins!

Well, I wasn’t quite planning on starting the bathroom renovation quite yet, but you know how sometimes things just happen.

This is our full bathroom. 

P1200023

P1130009

Yes, we have 2 scales. The one above is Mary Lou – my scale.  John used the numbers scale.

It’s actually a nice size room and it has a big window in it, so that it nice.  Since we have a 100-year-old house, we have a couple room that have an angled ceiling and the bathroom is one of them.  That means the shower is weird.

P1130008

We’ll just ignore the shower curtain hanging issue for now.

P1190019


This seems to be 1980s era tile.  I don’t know how well the color shows, but it is dark green and kind of an off white tile. It was okay for a while when we moved in, but there are certain things that I really don’t like.  I hate how this vanity was tiled to the walls.

We don’t have any drawer storage, so stuff just gets jumbled up underneath – and I end up leaving stuff on the counter (jumbled up). 

The thing I hate the most is the toothbrush holder.  Why?  The holes are all different sizes and my toothbrush doesn’t fit in there.

P1190018

Good quality check on that one. Sorry for any of you with OCD tendencies as this photo probably drives you as crazy as it does me!  The brush gets stuck in there too, and I have knocked the cup over that sits on this because of that.  Annoying. 

The floor tiles is also cracked and broken in spots. 

P1190016

We had a few thoughts.  One was to have a company come in and refinish the tub, then put wainscoting over the tile in the rest of the bath and putting in a new vanity. However, I didn’t want to risk dampness in between the tile and wainscoting. Plus, behind the current vanity there is no tile, so we would have to build the wall up with plywood or something to have the same depth.  Then we thought about have them come in and refinish all the walls as well and we would just replace the flooring.  However, that still leaves that annoying toothbrush holder, and the current vanity. 

After John and I did some talking and I presented my ideas, John pretty much said to do whatever I wanted.  He really needs to be careful about saying these things!  The bathroom is now all my project to do with as I will. 

Well, today in prepping for doing something at any rate, I got out my safety glass and a chisel:

P1200026

And popped off one of the towel holder tiles.  It had a hole in it and the tile just popped of the wall.

P1200029 

Okay – that kind of made my decision.  I started working and the tiles pretty much popped off on this wall.

If you work with tile stuff, please wear gloves. I was remiss and broken tile is razor sharp. I didn’t realize I had cut myself until a tile slipped in my hand because blood was dripping everywhere.

P1200030

I left that picture small.  Over sharing, but safety is serious business in rehab, so be prepared.  I bandaged, got work gloves and continued thereafter.

No going back now!  I have just a few patches and a skim coat of mud will do it.  The other wall behind the toilet is not as easy and I will have to replace some drywall.

P1200032

For inside the shower, we are going to try a new product by Rustoleum called Tile Transformations. It especially made for tiles and showers.  Then we will have a professional come in and resurface the tub (although that may be put off until next year).  That’s not something I would try to do myself.  The walls I will.  Hopefully that will turn out. If it doesn’t, we will just have the pro do the walls when he/she does the tub.  Guess we will find out.

I now have my work cut out for me for a bit!  Hmmmm… am I ready? It’s a big project. Little nervous because you never know what you will find underneath stuff in an old house.

P1200034

It’s a little complicated as well because it’s our only working full bath.  Thank goodness we put in the half bath downstairs.  That will come in handy when the floor comes out.  I figured best to start fairly soon so it isn’t interfering with biking season Big Grin

I’ll be making the signup announcement this week for the February Health Heart Weekend!  I need to come up with some prizes, so stay tuned!

Hugs from the shower

It was a pretty quiet weekend.

Lots of football!

tv

I forgot to show you my new shower head.  If you want to upgrade your bath experience, get a rain shower head.

OLYMPUS DIGITAL CAMERA

They are super easy to install. You just need a wrench and that’s pretty much it!

This was our old one.

old shower

And yes, that is the ceiling in our shower.  Old home and rooms get built into attic dormers.  This is a problem with the shower curtain and creates quite a design challenge.  But I digress…

Anyhoo, you don’t even have to turn the water off to do this because it is just the shower head.  Remove the head by using a wrench with a cloth wrapped around the head to keep from scratching.

OLYMPUS DIGITAL CAMERA

Then clean the threads from any plumber’s tape and you are ready to install.  This particular model says *not* to use plumber’s tape around the threads, so I did not (although we have some).  Screw the moveable ball onto the stem:

stem

Hand tighten this on, then use your wrench to tighten a little more.  It won’t go all the way up the threads. Don’t over tighten. This is where you will get leaks if you have any, so you might have to fiddle a bit.   Then it was time to install the head itself.  It just screws on.  You only want to hand tighten this. This top ring I am pointing to goes on the rod first.  Then you place the shower head on and screw this onto the head.  I wish I could have taken a different shot of this, but I needed both hands to actually put this on.

shower nut

Then test the shower head.  I had a bit of leakage, so I had to go back and tighten the ball.  Then it was perfect!

shower head

This arm is fully adjustable up and down and the head swivels from side to side so you can get it just perfect.

Look at the happy handy M’am!  This took all of 15 minutes.

me

Can I tell you how much I love this shower head?  I told John is was like getting a nice warm hug from the shower.  Go do this now, people.

Even if we never get any more work done on the bathroom this year, I am happy with this.

I did some bread baking.  Mostly for John, but I will eat some of this.

I used a recipe from King Arthur Flours website

bread

Some news – On the Billy front, we have a potential adopter for him.  (yay and sad). He will be going for a home visit this week and see how well they hit it off.  That is good, good news, so everyone keep your fingers crossed!

Cookies and closets!

Another busy weekend.  I worked Saturday morning until lunch time.  I won’t be working on Tuesday and I don’t know if there will be any clinics open tomorrow, so I grabbed some work on Saturday.  Then John requested his football meal out at a new place that opened up called Ambrosia Diner.
This is right off the Northway and they did it up right!  It was super busy, too.  I snuck a picture when the table opened up next to us so I wouldn’t get anybody in my photo.

You all know my favorite diner food – the omelet (breakfast all day)!  This was a feta cheese omelet.

It was very good, although I have to say the toast was anemic.  The meal was piping hot, which surprised me considering how busy they were.  They are open 24 hours, too!  I noted there was an espresso machine, so we might have to give that a try some time.

We also did cookie baking.  I did my every popular nutmeg logs and pistachio buttons.
John made cranberry bliss bars that are even better than those at Starbucks! I will have to have him give me the link to the recipe he used.
I know, right??? Amazing!

Then my favorite thing we did this weekend.  Installing closet doors!  When we moved into our house 6 years ago, there were no closet doors in any of the bedrooms.  We put some in our bedroom, but the guest bedroom as been just open for display to any of our guests LOL.

This was one of the niggling things that drove me nuts, but it was just a project we kept putting aside. Not sure why because it is a very easy project. I know we all have one of those projects.

I practice guitar in this room every day, so I think it bothered me more than John.  It was a lovely view.


Not even an hour later and we had this:

Our house is horribly unsquare, so we can only adjust the doors so much, but I am so, so happy!  And for $130 for wooden doors, that’s a good bargain.

Now to choose paint colors for this room.  These are taped to the wall right now to decide, but I think we are leaning to one of the 2 with the arrows.

I gathered up the family presents to take downstairs and put under the tree in preparation for Monday. Came back with more and found this.  Pixie decided she wants to be wrapped up under the tree:

She’s so cute that it is hard to get mad at her.

Not sure what work will be done tomorrow, but the family comes over for dinner which John and I host, so lots of cooking (and eating) Monday!

Today’s ornament?

Another rare tuba find for John 😀

Merry Christmas and Happy Festivus to everyone!

The flooring reveal

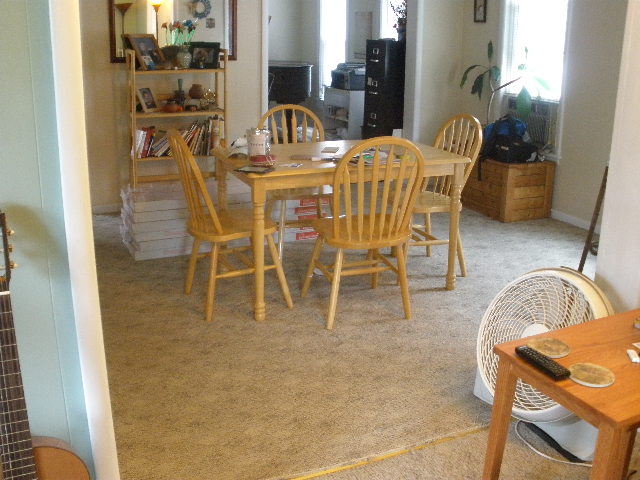
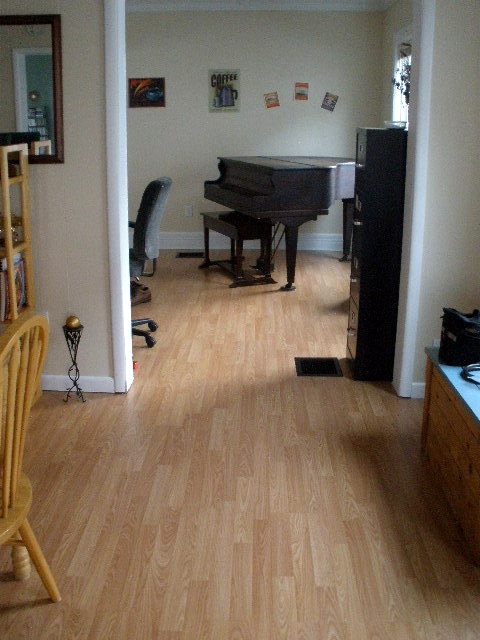
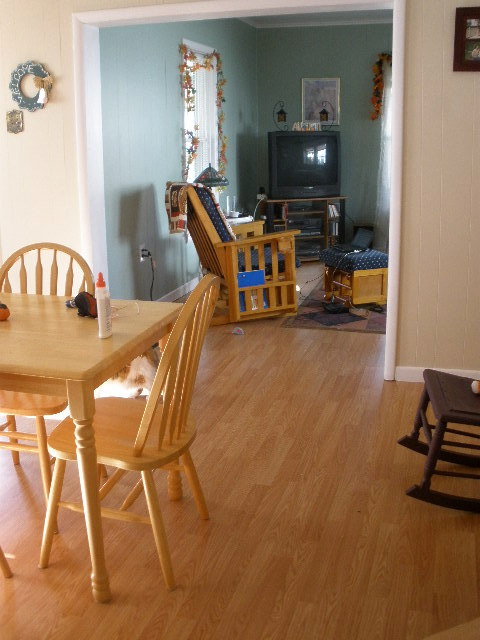
The floors have been finished and we are enjoying them!  No more nasty carpet and now everything is back in place again!  We finished this project pretty quickly because having your life in disarray from home improvement sucks big time.  Especially when it is your entire downstairs and you  work from home.  We just did a little bit each day to keep things moving.

First off, the laminate flooring itself was from Lowe’s.  It is called Winchester Oak and it was only 68 cents per square foot.  While we would have loved hardwood floors, there were a couple reasons why we didn’t go with that. The expense, for one.  In our neighborhood and the price of real estate, the cost of hardwood floors would not give us the return that we would need to put them in.  Now in our house that we plan to live in for a very, very long time – yes, hardwoods will happen, but not here.   The other reason is our uneven floors.  With a 100+ year old house, there is a lot of settling that goes on and the floors have some bumps and bulges in them that only a complete subfloor replacement would solve.  Not going to happen.  The more inexpensive laminate actually has some give to it to work along those bumps, along with some strategically placed extra underlayment.  Of course, this breaks all rules of laying flooring, but we are rule breakers…

Bye-bye old carpet:

Ta Da!!

Dining room:

Office:

Kitchen through to living room:


The thing I really love is that we were able to do the room with no transitions between the rooms because of the layout of the doorways.  There is a maximum they recommend without using transitions and we were under that.  It makes the rooms much more spacious.

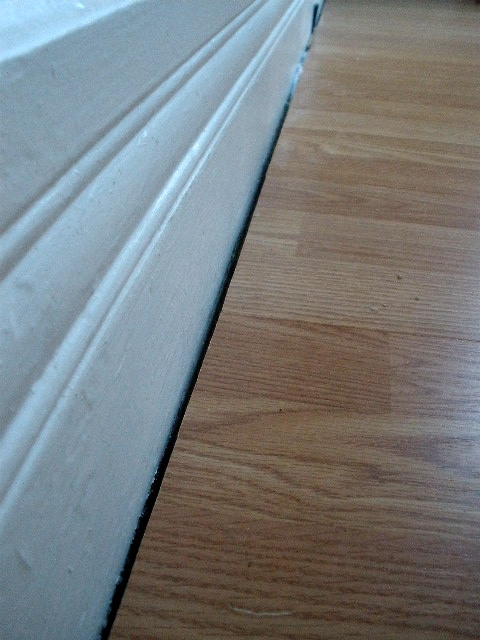
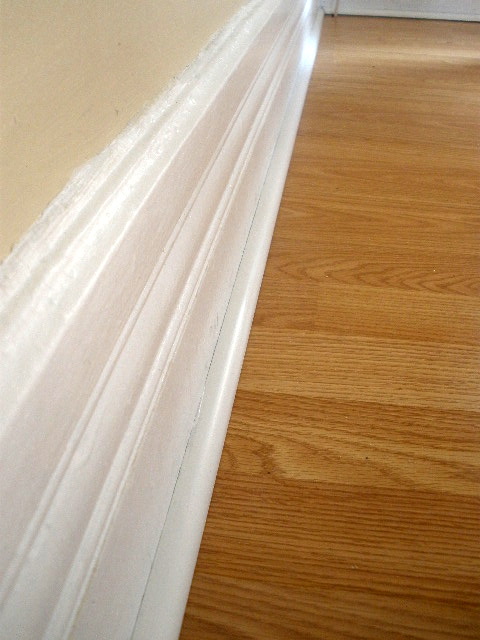
The only room we didn’t remove the baseboards in was the office.  These are big solid baseboards and we were afraid we would wreck the plaster walls.  You can see the gap here between the flooring and the baseboards.  This gap is necessary for expansion and contraction of the flooring.

The solution?  Quarter round shoe molding!  They think of everything in the world of home improvement.

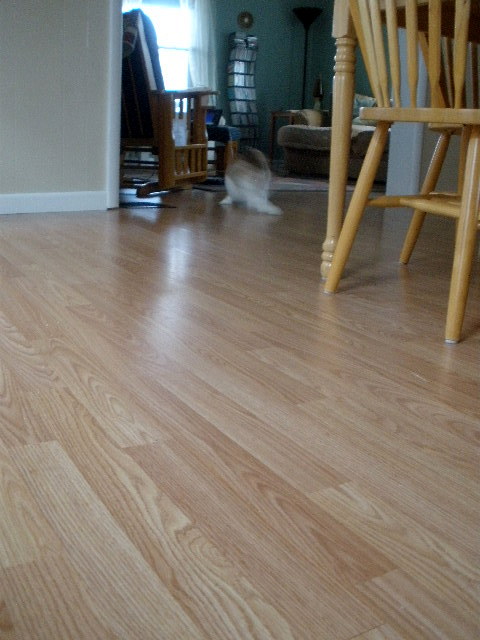
Pixie seems to really enjoy the floors for playing.  You can see her in the background as a blur  scooting a paper ball.

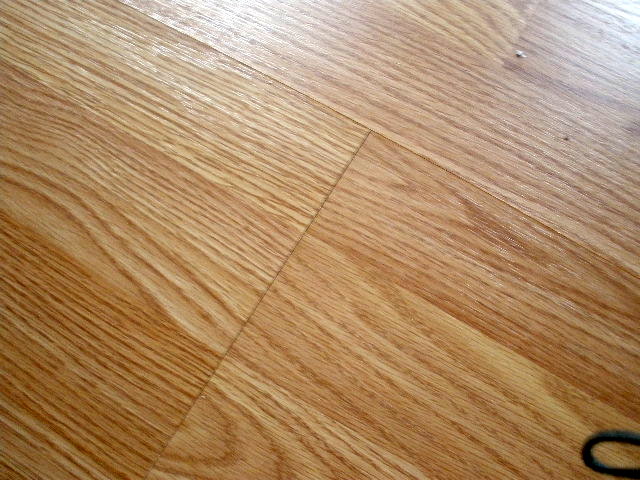
The floors aren’t perfect.  There are a couple spots where there is a tiny gap, which I think is from just the cheapness of the flooring (being honest here). Just enough to catch a fingernail on, but you don’t notice it unless you stick your nose down there – like it was when putting in the floor :mrgreen:  .

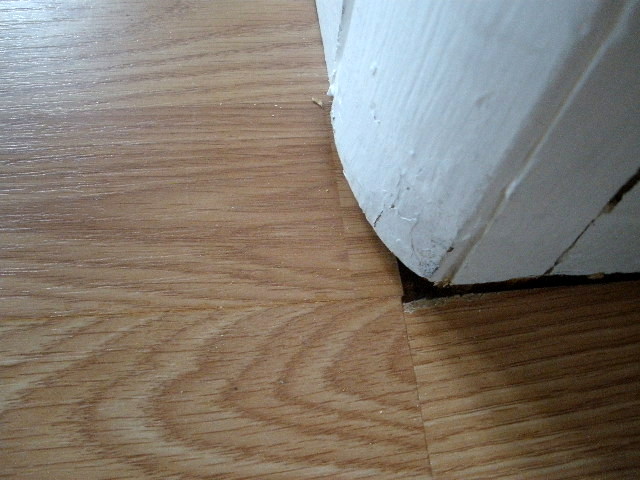
Also some corner issues.

We undercut the molding, but it is hard to cut the laminate pieces to fit exactly, plus you don’t want them to be really  snug for expansion purposes.  We will patch these spots.

You have already seen the living room:


Total cost for the project included all of the flooring, the underlayment, 2 saw blades, transition pieces for the kitchen and the shoe molding for the office – $686.  We already had paint and were able to save all of the baseboards and repaint them.  Plus we had the little toolkit from doing the laminate upstairs.   We should get a big ROI on this project!

It took around 4 weeks to finish, which isn’t all that bad!  And I love, love, love the floors.  I don’t know if I will ever get tired of saying I love the floors, even though John may get tired of me saying that!

Between the new driveway,  the repainted front porch, and the new floors with rearranging the living room, it’s like we moved into a new house!

Today’s pink item:


The Breast Cancer Site

Is the weekend over already?

**Don’t forget – the Sahale Crunchers give away ends Monday!**

We had a good weekend, although the weather was not all that cooperative.  It was in the 20s Saturday morning.  Most of my garden got toasted from that since it was a killing freeze and not just frost.

I wanted to get my 25 minute run out of the way, so after breakfast when it warmed up into the 30s (!!!), we headed down to the track. I think I have figured out that it is going faster that is what is so hard on my weak thigh muscle, so my version of running is now officially titled Lori 2.slow

I did about 2 miles in 25 minutes and did pretty well.  This doesn’t make me really breathe all that hard because my cardio fitness is good, but that is the speed my leg is okay with.  I need to learn to be okay with that.  I think I am okay with that for now, but you know how the brain can fool you sometimes 😀

It got warm enough to about 50 degrees, so we went on an afternoon bike ride, too!  Still have to be pretty bundled up for that, but the sun was out and I was happy to ride.  The fall blooming plants are  still around.

And Kale.

I still like kale better as garnish than eating it.  :mrgreen:

I also saw the computer roll over 2000 miles for the season:

I was beginning to wonder if I was going to hit that with all the icky weather the last month or so.  You would think I would be stick thin with all those miles, but it just shows you that tons of cardio doesn’t always = weight loss  😉

Sunday was trying to finish up the floors.  We are so close. The living room is all finished and put back together.  I am soooooooooooo happy!  So happy!

Before:

Today:

We decided to rearrange the room a bit as  well.  It may not stay like this, but we like it for now.  The register covers are not in place yet because they are getting painted, but it is nice to have a room back to normal.  It is also nice because we decluttered the room as well.  Bonus.

We are just putting up shoe molding in the office and replacing the last couple baseboards in the dining room and we then we can put the rest of the furniture back in place.  Hooray!  This is the dining room and office right now:

Still in a bit of disarray, but probably just another couple hours to finish up and put the furniture back.  Then we will be ready to show off our floors for the big holiday dinner this year!

Today’s pink item:

You had to know that a bargain girl like me would use Suave, right?


The Breast Cancer Site

Flooring and family

It was a busy one,  but a rainy one.  We were hoping to get in a bike ride, but no such luck.  The weather channel on Saturday said early morning showers and then it would clear up.  So, we spent Saturday morning working on the floors and waiting for the rain to stop.

We are in room 2 now, which is the room with the piano.  We wanted to move it as little as possible because it’s heavy for one, and there is always the fear of messing up the legs (even though it has wheels, they are tiny)  and have the piano crash over.  To help, John disassembled some of the piano by removing the lid and the action (the keyboard).

That helped, but still pretty heavy, especially with my wonky shoulder.  We slid it over and then worked on that part of the floor.

After we got half the room done, we slid the piano back  to the flooring to do the other part. Nothing like working piecemeal on the floor, but you do what you can.

Still raining, so we went out for lunch.  John wanted to go back to the Village Bakery for his football meal.

The happy winner…  (I still love him, though).

Again, this place just does not disappoint!  I had a cheese omelet – breakfast all day!!

Fresh baked wheat toast.  So good!

It rained off an on all day, so no biking.  I was bummed.  We got a lot of floor done, though.  With Pixie’s help.

She loves checking out everything we are doing.

I am loving the floors.  Loving them!  It is so funny that when looking at the dining room, it is almost like the floors have always been there and there never was a rug.  Of course, we still need to put the baseboards back up, but that will wait until the whole floor is done and any shifting takes place.

Sunday was family day.  It was my mother’s birthday and my niece had her birthday on Friday, so we had a dinner.  A turkey dinner, in fact!

The big bird – I think this is a 36 pound bird (raised by my brother-in-law).

We are all getting into the guitar now.  One of my nieces and my sister are now getting lessons.  My sister is learning a 12-string.

We are going to play stuff together at Christmas, although they are learning a different playing style than I play.

I was going to review my September goals today, but I think I save that for tomorrow.  It’s been a busy and tiring weekend!

I did win the football picks this week –